Developer Bootstrap
On This page
On Related Pages
Getting Started
Install the following dependencies:
- Java Development Kit - Version 11: we use Amazon Corretto in production.
- Git: Set up your local git environment according to Sage’s GitHub Security guidance
- Maven 3
- Eclipse (or other preferred Java IDE, like IntelliJ IDEA, VS Code etc)
Note: Spring Tools provides an Eclipse build that bundles a lot of useful plugins - MySQL server (version 8.0.33 or check which version is currently used for production under the "
EngineVersion" key, newest releases may have issues): See https://downloads.mysql.com/archives/community/ and select the same version as used in production. As an alternative the official docker image https://hub.docker.com/_/mysql can be used to start an instance. Mac user should Launching MySQL with Docker to start an instance through docker compose.
There are also GUIs available for MySQL that can be useful for management, among which MySQL Workbench and HeidiSQL.
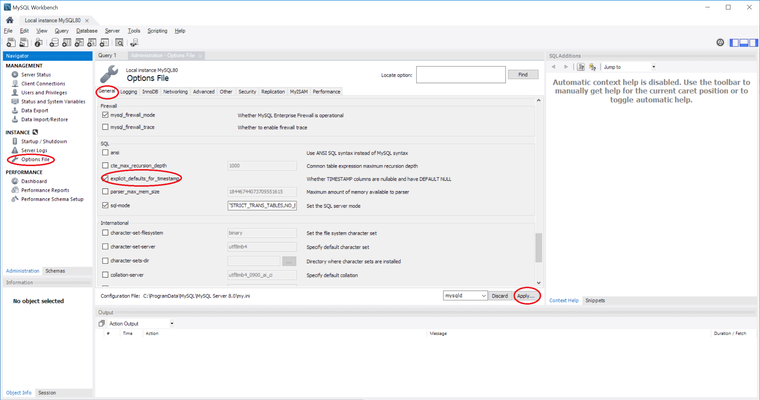
Note: explicit_defaults_for_timestamp needs to be set to ON.
Instruction on setting explicit_defaults_for_timestamp:
- Open localhost connection. On the left panel, Under INSTANCE, choose "Options File"
- Under the "General" tab, scroll down to "SQL", make sure that
explicit_defaults_for_timestampis checked - Click Apply
- Restart MySQL server
See Developer Tools for links to the installers.
Setting up dev environment on Sage laptop – Windows x64
- Install Java JDK (64-bit, 11) – set up JAVA_HOME variable (JDK's install directory, not the /bin folder) and add JAVA_HOME/bin to PATH
- It is possible to have multiple JDK versions installed, just make sure that the IDE and maven are using 11 when building the project
- Install Eclipse (64-bit)
- Install Maven (most recent stable release); and add to PATH
- Install M2Eclipse plugin from http://download.eclipse.org/technology/m2e/releases
- Sometimes, fresh copies of Eclipse will not have all the dependencies installed. Particularly, M2E may complain about SLF4J 1.6.2.
- Either reinstall Eclipse or search the marketplace for the module.
- Point Eclipse to the JDK
- Open Eclipse and navigate to Window->Preferences
- Open the submenu Java->Installed JREs
- Click Add..->Standard VM->Directory, and input the JDK directory
- Then finish and check the JDK (uncheck the JRE)
- Make sure the path to the JDK is ahead of "%SystemRoot%\system32", since Eclipse will otherwise use some other Java VM when starting up Eclipse.
- Turn off indexing (at least on the project directory).
Setting up dev environment on macOS (June 2018)
Make sure you have the Xcode Command Line Tools, which you can install with
xcode-select --install
I recommend using Homebrew to install Maven and Git. You can also install Eclipse and MySQLWorkbench with Homebrew if desired.
brew install maven git
brew tap homebrew/cask
brew install eclipse-ide mysqlworkbench
Using Homebrew to install the JDK or MySQL should be done with caution, because can be difficult to configure Homebrew to use older versions of this software (which Synapse may require as new versions of the JDK and MySQL are released). You can access binaries for the older versions of Java and MySQL with an Oracle account (Google should lead you to these downloads easily).
Your ~/.bash_profile (Note: will be ~/.zshenv if you are on MacOS Catalina or later) should look something like this (where version numbers may differ slightly, and locations may differ entirely if you installed your software differently; check your machine to make sure these folders exist):
export JAVA_HOME=/Library/Java/JavaVirtualMachines/jdk11.jdk/Contents/Home/
export M2_HOME=/usr/local/Cellar/maven/3.5.3/libexec
export M2=$M2_HOME/bin

# The following may not be necessary:
export PATH=${PATH}:/usr/local/mysql/bin 	# To fix MySQL installation after removing a previous installation via Homebrew
Using the steps above, you can configure your MySQL server with MySQLWorkbench. You may need to create a file at /etc/my.cnf to edit the configuration and set explicit_defaults_for_timestamp.
Though it might be dated, consider checking out Macintosh Bootstrap Tips for additional reference.
Synapse Platform Codebase
Get the Maven Build working
Fork the Sage-Bionetworks Synapse-Repository-Services repository into your own GitHub account: https://help.github.com/articles/fork-a-repo
Make sure you do not have any spaces in the path of your development directory, the parent directory for PLFM and SWC. For example: C:\cygwin64\home\Njand\Sage Bionetworks\Synapse-Repository-Services needs to become: C:\cygwin64\home\Njand\SageBionetworks\Synapse-Repository-Services
Check out everything
git clone https://github.com/[YOUR GITHUB NAME]/Synapse-Repository-Services.git
Setup the Sage Bionetwork Synapse-Repository-Services repository to be the "upstream" remote for your clone
# change into local clone directory
cd Synapse-Repository-Services

# set Sage-Bionetwork's Synapse-Repository-Services as remote called "upstream"
git remote add upstream https://github.com/Sage-Bionetworks/Synapse-Repository-Services
Download your forked repo's develop branch, then pull in changes from the central Sage-Bionetwork's Synapse-Repository-Services develop branch
# bring origin's develop branch down locally
git checkout -b develop remotes/origin/develop

# fetch and merge changes from the Sage-Bionetworks repo into your local clone
git fetch upstream
git merge upstream/develop
Note: this is NOT how you should update your local repo in your regular workflow. For that see the Git Workflow page.
- Stack Name
- Your stack name will be
dev - Your stack instance will be whatever you like, we recommend your unix username
- Your stack name will be
- Setup MySQL
- Mac user should Launching MySQL with Docker to start an instance through docker compose.
- Start a command-line mysql session with "sudo mysql"
Create a MySQL user with your named
dev[YourUsername]with a password ofplatform.create user 'dev[YourUsername]'@'%' identified BY 'platform'; grant all on *.* to 'dev[YourUsername]'@'%' with grant option;
Create a MySQL schema named
dev[YourUsername]and grant permissions to your user.create database `dev[YourUsername]`; # This might not be needed anymore grant all on `dev[YourUsername]`.* to 'dev[YourUsername]'@'%';
Create a schema for the tables feature named
dev[YourUsername]tablescreate database `dev[YourUsername]tables`; # This might not be needed anymore grant all on `dev[YourUsername]tables`.* to 'dev[YourUsername]'@'%';
This allows legacy MySQL stored functions to work. It may not be necessary in the future if all MySQL functions are updated to MySQL 8 standards.
set global log_bin_trust_function_creators=1;
Note: Use set PERSIST in order to keep the configuration parameter between MySQL restarts (e.g. if the MySQL service is not setup to start automatically). Alternatively, use the Options Files to set this checkbox (under the Logging tab, under Binlog Options).
This allows queries with ORDER BY/GROUP BY clauses where the SELECT list does not match the ORDER BY/GROUP BY clause.
SET GLOBAL sql_mode=(SELECT REPLACE(@@sql_mode,'ONLY_FULL_GROUP_BY',''));
- Setup AWS Resources
The build expects certain AWS resources to be instantiated. Use a Jenkins stack builder job to automatically instantiate the build for you. (If you wish later to delete any of the resources you created see the "Deleting CloudFormation Stacks" section.)- Log in to https://build-system-synapse.dev.sagebase.org and create a new job (click New Item in dashboard).
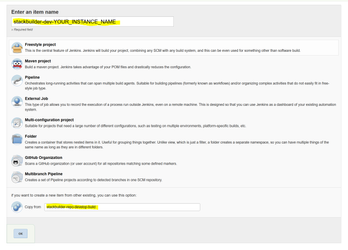
You will need to be on the VPN to access the Jenkins Server, directions to set up VPN can be found here, as well as an account on the Jenkins server (contact IT). - name the project
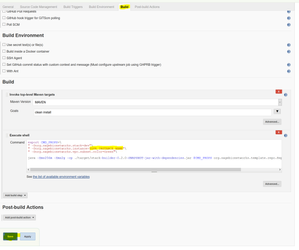
stackbuilder-dev-[YourUsername]and copy settings fromstackbuilder-repo-develop-build. Then click OK - Click on the "Build" tab and modify the line
" -Dorg.sagebionetworks.instance=YourUsername"\
Then click Save.
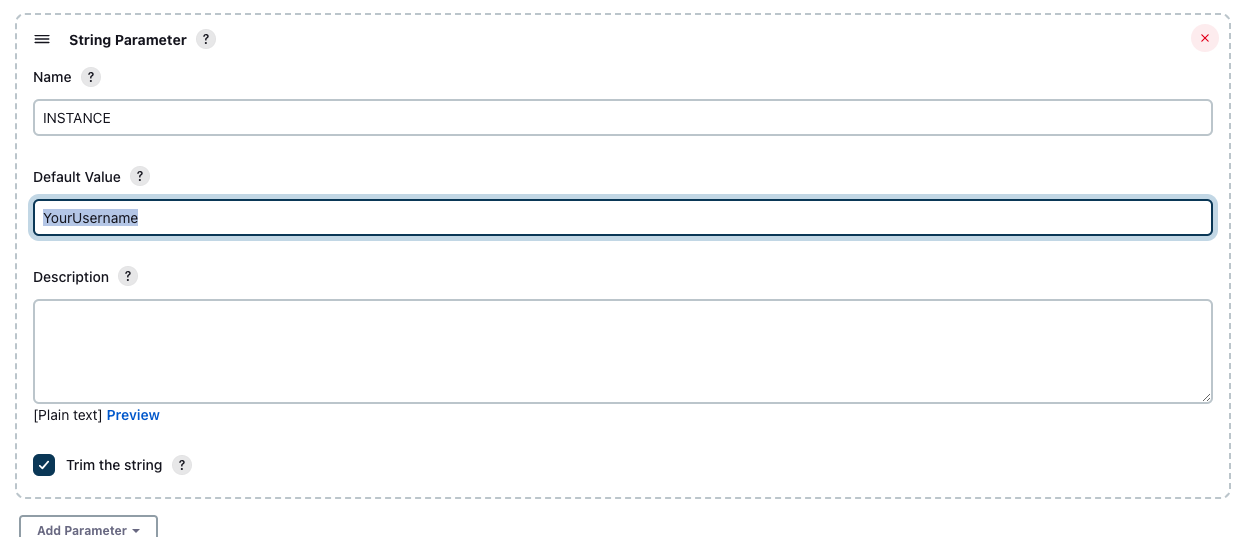
Note:This may be represented as a String Parameter: " -Dorg.sagebionetworks.instance=${INSTANCE}"\, in that case, change the value of theINSTANCEparameter to YourUsername - On the next page, click "Build with Parameters" in the left navigation then "Build". Proceed to the next steps while waiting for this build to complete.
- Log in to https://build-system-synapse.dev.sagebase.org and create a new job (click New Item in dashboard).
- Create your maven settings file ~
/.m2/settings.xml- The settings file tells maven where to find your property file and what encryption key should be used to decrypt passwords.
Use this
settings.xmlas your template
settings.xml<settings xmlns="http://maven.apache.org/SETTINGS/1.0.0" xmlns:xsi="http://www.w3.org/2001/XMLSchema-instance" xsi:schemaLocation="http://maven.apache.org/SETTINGS/1.0.0 http://maven.apache.org/xsd/settings-1.0.0.xsd"> <localRepository/> <interactiveMode/> <usePluginRegistry/> <offline/> <pluginGroups/> <servers/> <mirrors/> <proxies/> <profiles> <profile> <id>dev-environment</id> <activation> <activeByDefault>true</activeByDefault> </activation> <properties> <org.sagebionetworks.stackEncryptionKey>20c832f5c262b9d228c721c190567ae0</org.sagebionetworks.stackEncryptionKey> <org.sagebionetworks.developer>YourUsername</org.sagebionetworks.developer> <org.sagebionetworks.stack.instance>YourUsername</org.sagebionetworks.stack.instance> <org.sagebionetworks.google.cloud.enabled>true</org.sagebionetworks.google.cloud.enabled> <!-- If using not using Google Cloud, set the above setting to false. The following org.sagebionetworks.google.cloud.* settings may be omitted --> <org.sagebionetworks.google.cloud.client.id>googleCloudDevAccountId</org.sagebionetworks.google.cloud.client.id> <org.sagebionetworks.google.cloud.client.email>googleCloudDevAccountEmail</org.sagebionetworks.google.cloud.client.email> <org.sagebionetworks.google.cloud.key>googleCloudDevAccountPrivateKey</org.sagebionetworks.google.cloud.key> <org.sagebionetworks.google.cloud.key.id>googleCloudDevAccountPrivateKeyId</org.sagebionetworks.google.cloud.key.id> <org.sagebionetworks.stack>dev</org.sagebionetworks.stack> </properties> </profile> </profiles> <activeProfiles/> </settings>- Everywhere you see "YourUsername", change it to your stack instance name (i.e. the username you used to set up MySQL and the AWS shared-resources)
- If using Google Cloud (recommended if you are working on file upload features), get the Google Cloud developer credentials from the shared LastPass entry titled 'synapse-google-storage-dev-key'. Paste the corresponding fields in the attached JSON file into the org.sagebionetworks.google.cloud elements. Note the private key should be given on one line, with new lines separated with '\n' and NOT '\\n'.
- If you don't need to use Google Cloud features, then set
org.sagebionetworks.google.cloud.enabledto be false. The other Google Cloud parameters can be omitted.
- If you don't need to use Google Cloud features, then set
Once your settings file is setup, you can Build everything via
`mvn`which will run all the tests and then install any resulting jars and wars in your local maven repository.cd Synapse-Repository-Services mvn install
- Note that you might get an error that says
Illegal access: this web application instance has been stopped already.This is normal. Scroll up to see whether the build succeeded or failed. (You may have to scroll through several pages of this error.) - If tests fail, then you should run
mvn clean installafter debugging your failed build. - Many tests assume you have a clean database. Before running tests, be sure to drop all tables in your database. Synapse will automatically recreate them as part of the tests.
- When you pull updates from upstream, be sure to run
mvn clean install -DskipTestsfrom the root project, which will rebuild everything. If necessary, runmvn testfrom the root to ensure all tests pass. - Tests can also fail because sometimes IntelliJ does not configure itself appropriately, if this case, please following these steps.
- Go to the Synapse-Repository-Services repository and execute ls -a to find '.idea' folder, which is the configuration folder of IntelliJ IDEA.
- Execute 'rm -r .idea' to delete configuration folder and re-configure IntelliJ IDEA (please follow 'Configuring IntelliJ IDEA' section again)
- Either terminal in IntelliJ IDEA or own terminal, execute 'mvn clean install -Dmaven.test.skip=true' to make sure all files are configured correctly. (skipTests are deprecated in Maven Surefire Plugin Version 3.0.0-M3)
If the integration tests fail, try restarting the computer. This resets the open connections that may have become saturated while building/testing.
- Note that you might get an error that says
- Take a look at the javadocs, they are in
target/apidocs/index.htmlandtarget/testapidocs/index.htmlfor each package
Configuring IntelliJ IDEA (June 2018)
IntelliJ IDEA is an IDE that can be easier to configure to work with the Synapse build than Eclipse. Follow this section if you want to use it instead of Eclipse. Otherwise, you can skip this section.
When you install IntelliJ IDEA, make sure you also install the Maven plugin (should install by default).
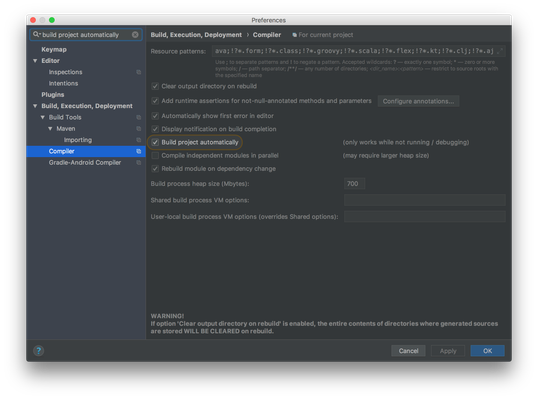
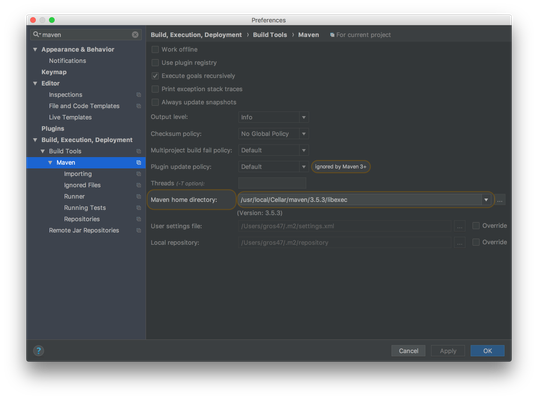
There are two settings that you should change in your preferences before installing. You should enable 'Build Project Automatically', and set your Maven home directory to the location of the Maven installation that you used to successfully build the codebase.
After configuring IntelliJ IDEA, you can import the project by pointing to the folder 'Synapse-Repository-Services' and select Maven from 'Import project from external model'. The default settings can be used to finish importing the project.
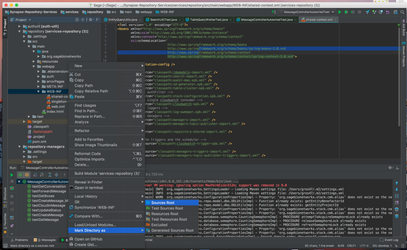
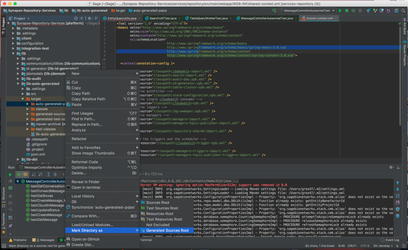
After this, you need to configure your CLASSPATH. You can easily do this via right-clicking the following folders; mark /lib-auto-generated/target/auto-generated-pojos/ as Sources Root (or Generated Sources Root), and mark /services/repository/src/main/webapp/WEB-INF/ as Sources Root. You may want to confirm that the other folders (listed below in Get your Eclipse Build working) have been marked as Sources Root, but IntelliJ IDEA should have done this automatically. This should complete your configuration, and you can run a few tests to confirm that your repository works.
Note that every time you re-import the above Maven projects, you will need to mark them again.
Get your Eclipse Build working
- Use the eclipse maven plugin to import all the projects
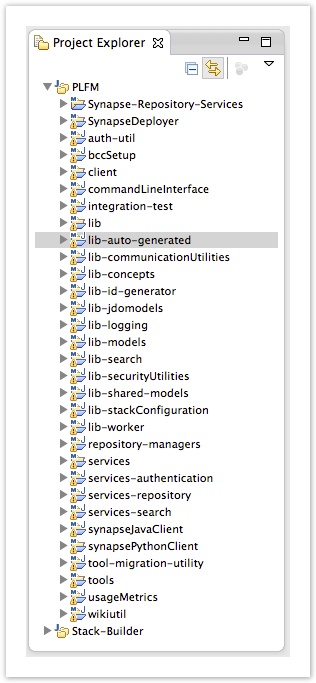
- Synapse-Repository-Services has several sub-projects. Eclipse creates a project for each. It's convenient to group these together into a Working Set called PLFM. (From the menu, select File|New|Java Working Set...)
- Configure build path
Add the generated sources to the following projects. (right click and select Build-Path->Use as Source-Folder). If you don't see those folders, refresh the projects until they appear.
/repository-managers/target/generated-sources/jjtree
- /repository-managers/target/generated-sources/javacc
- /lib-auto-generated/target/auto-generated-pojos
- /lib-table-query/target/generated-sources/javacc
If you're missing ParseException, you need to confirm the above are added as source folders without any exclusion filters enabled.
- Right-click each project that has auto-generated source files, and under Properties->Build Path->Source, all exclusion filters should be cleared.
- Be sure to remove the "Excluded" filter on this folder
- /lib-auto-generated/target/auto-generated-pojos
- Be sure to remove the "Excluded" filter on this folder
Fixing Eclipse errors after Update
Occasionally, we will make dramatic changes to the PLFM project, like moving or renaming sub-projects. This can cause Eclipse to complain about missing dependencies even after a clean + build (Projects -> Clean... -> "Clean All Projects"). The following steps should help eclipse resolve its dependency problems:
- Close Eclipse.
- Delete your org.sagebionetworks from your local .m2 directory (i.e. Windows user: C:\Users\<your username>\.m2\repository\org)
Rebuild all sage artifacts in your local maven repository by running the following from the command line:
mvn clean install -Dmaven.test.skip=true
Since tests will be skipped this should only take a few minutes. Any build failures in integration-tests can be ignored since the project does not produce any artifacts.
- Open Eclipse.
- Refresh from the root folder (i.e.trunk). Either right-click the root folder and select "refresh" or select the root folder and press F5.
- At this point you need to look for any sub-projects or folders that are not in SVN, that you did not create. In Eclipse these will show up with the little '?' on the icon, or they will show up as "additions" when you synchronize with SVN. All of these projects and folders need to be deleted from your local machine.
- Next we need to detect any new projects. Here is the simplest way to do this in Eclipse:
- Right-click on the root folder (i.e. trunk) and select "Import..."
- From the dialog select Maven->"Existing Maven Projects"
- Click next
- All existing projects should be greyed out and all new projects should automatically be selected. If not select the new projects.
- Click finish
- Believe it or not, Eclipse needs another refresh (F5).
- Now we need to force Eclipse to do a full clean and build of all projects.
- Select "Projects" from the main menu
- Select "Clean..."
- Select "Clean all Projects"
- We now need Eclipse to update its dependencies for all projects with errors. However, the order in which you do this is important. If project B depends on project A, then you must update project A first, then B. To update the maven dependencies for a project: right-click on the project and select Maven->"Update Dependencies"
- If you still have error, update the dependencies in a different order. When you get the order correct, you should have no more missing dependencies errors.
- Note: Ensure that source folders for auto-generated classes are on the projects' class paths. For more information, see the section "Build Troubleshooting", below.
Service Development
- First make sure you have followed all the instructions to set up the Synapse Platform Codebase
- Authenticate to AWS. The following one-time set-up is required.
- Install the AWS CLI.
aws configure sso
SSO session name (Recommended): synapse-dev
SSO start URL [None]: https://d-906769aa66.awsapps.com/start/#
SSO region [None]: us-east-1
SSO registration scopes [sso:account:access]:
<browser will open, displaying a confirmation page>
> "There are xx AWS accounts available to you."
Select the account ID 449435941126
Use the role name "Developer"
CLI default client Region [us-east-1]: us-east-1
CLI default output format [None]:
CLI profile name [Developer-449435941126]: default
- Remove any credentials you have under 'default' in ~/.aws/credentials.
- Once this set up is complete, simply run
aws sso loginto log in in the future.
- Run a local tomcat servlet container and send it a few requests
- cd services/repository/
mvn tomcat:run- You know its running successfully when the last line says "INFO: The server is running at http://localhost:8080/"
- Alternatively (preferably?), you can
cd integration-tests/andmvn cargo:run. This should launch a tomcat server on port 8080. When running the application usingmvn cargo:run, the context for the API requests will be relative to the version of the repository services. This endpoint will be set to http://localhost:8080/services-repository-${project.version}, where {$project-version} is develop-SNAPSHOT: http://localhost:8080/services-repository-develop-SNAPSHOT/.- Note: try visiting http://localhost:8080/services-repository-develop-SNAPSHOT/repo/v1/version to see the
versionandstackInstanceof the local project. The web page should load:{"version":"develop-SNAPSHOT","stackInstance":"<your_username>"}
- Note: try visiting http://localhost:8080/services-repository-develop-SNAPSHOT/repo/v1/version to see the
To create users for testing, you can use the following script. (Note that the actual username and API key are in fact "migrationAdmin" and "fake". These are only valid on local builds.)
export REPO_ENDPOINT=http://localhost:8080
export ADMIN_USERNAME=migrationAdmin
export ADMIN_APIKEY=fake
export USERNAME_TO_CREATE=[username]
export PASSWORD_TO_CREATE=[password]
export EMAIL_TO_CREATE=[email]

curl -s https://raw.githubusercontent.com/Sage-Bionetworks/CI-Build-Tools/master/dev-stack/create_user.sh | bash
- For API information, see https://rest-docs.synapse.org/rest/index.html Use your favorite HTTP request client (curl, Postman, etc) to construct HTTP requests. Particularly useful are the auth APIs https://rest-docs.synapse.org/rest/index.html#org.sagebionetworks.auth.AuthenticationController
- See Repository Service API for curl examples.
- Take a look at the continuous build for this service http://sagebionetworks.jira.com/builds/browse/PLFM-REPOSVCTRUNK
- Learn more about the Tomcat Maven Plugin http://mojo.codehaus.org/tomcat-maven-plugin/
- See the Service API Design REST Details section wiki page for links to Spring MVC 3.0 info and other good stuff.
- See Configuring a Web Project to run in Tomcat or AWS if you want to run tomcat via eclipse
How to run the unit tests
To run all the unit tests:
mvn test
To run just one unit test:
mvn test -Dtest=DatasetControllerTest
How to run the unit tests against a local MySQL
See how to set up a local MySQL
Note that the default user for a locally installed MySQL is root and the default password is the empty string. You only need to use PARAM1 and PARAM2 below if you have configured your local MySQL differently.
To run all the unit tests:
mvn test -DJDBC_CONNECTION_STRING=jdbc:mysql://localhost/test2 [-DPARAM1=theMysqlUser -DPARAM2=theMysqlPassword]
To run just one unit test:
mvn test -DJDBC_CONNECTION_STRING=jdbc:mysql://localhost/test2 [-DPARAM1=theMysqlUser -DPARAM2=theMysqlPassword] -Dtest=DatasetControllerTest
Note that these all pass and should continue to do so.
How to run a local instance of the service
You can use the integration tests, described below, to run a local instance of the service.
How to debug a local instance using the Eclipse remote debugger
- In the integration-test/pom.xml file, uncomment lines 141 - 143 (starts with <cargo.jvmargs>). This enables remote debugging on the deployment stack.
- In Eclipse, navigate to the Debug Configurations.
- Create a new Remote Java Application configuration.
- On the 'Connect' tab, select the 'services-repository' project in the 'Project' field, and set the connection properties to use localhost port 8989.
- On the 'Source' tab, add all projects contained within Synapse-Repository-Services.
- Click 'Apply' to save the debug config.
- Start the repository services (mvn cargo:run in the 'integration-test' folder).
- (You should see a message that indicates that the repo services are in debug mode, listening on port 8989.)
- Start the debug configuration you just created in Eclipse.
- (The repo services should finish initializing.)
- Start the Portal.html in GWT dev mode in Eclipse.
Be sure to restore the integration-test/pom.xml file when you are done using remote debugging.
How to run the REST API documentation generator
See REST API Documentation Generation
Integration Test Development
How to debug the integration tests
The wiki generator and several of our integration tests expect a subset of prod SageBioCurated data to exist in the service. To populate a local stack with that data, do this by
- running the following single integration tests:
~/platform/trunk/integration-test>mvn -Dit.test=IT100BackupRestoration verify
- and then once the database is populated we can restart the local stack in debug mode:
~/platform/trunk/integration-test>mvn cargo:run
- running the following single integration tests:
- In eclipse stick a break point at the beginning of the test you want to debug
You'll need the following VM Args for the tests or you can put these in your local properties file
-Dorg.sagebionetworks.auth.service.base.url=http://localhost:8080/services-authentication-0.10-SNAPSHOT/auth/v1
-Dorg.sagebionetworks.repository.service.base.url=http://localhost:8080/services-repository-0.10-SNAPSHOT/repo/v1
- Debug all the tests in order. Some of the tests depend upon the fact that the data loader test has run and populated the repository service. The debugger will stop at the test where you set the break point and you can step through the test from there.
Build Troubleshooting
Several things to try if your local build is failing.
- Refresh all files (From within Eclipse, select the projects to be refreshed and either press F5 or right-click and select 'Refresh').
- If the build fails at services-repository, ensure that MySQL is running your development database.
- If it still fails at services-repository, and you have a local property override file your properties file may be incorrectly named. Ensure that the name is dev<your_username>.properties (e.g. devdeflaux.properties). (To be more specific--the properties file name should match the stack-instance name in your devmvn-settings.xml file).
- If a file or files in a project aren't 'seeing' something they should (if there's an error for an import statement, for instance), try deleting the project and re-importing it.
- Make sure NOT to delete the project code on file when doing this. Delete only from inside Eclipse.
- If the build is still failing for no discernible reason, especially if it fails at lib-jdomodels, try dropping your development database, then recreating it.
You can do this on Windows using the MySQL Command Line Client. Enter your password and run:
DROP DATABASE <database_name>;
CREATE DATABASE <database_name>;
Running a Dockerized Local Build
Prepare and execute a script, local_build.sh, located in the root directory of the git clone like this:
#!/bin/bash
export user=
export m2_cache_parent_folder=
export src_folder=
export org_sagebionetworks_stackEncryptionKey=
export rds_password=platform
BASEDIR=$(dirname "$0")
${BASEDIR}/docker_build.sh
This allows running a build without first installing Java, Maven or MySQL. You do need to install Docker first. To execute, run
./local_build.sh
How to create a Private, Cloud-based Build
When you push to your GitHub fork, a build will be triggered in AWS Code Pipeline. Prior to pushing a change to your fork, enable the build by sending a PR to https://github.com/Sage-Bionetworks-IT/organizations-infra, adding your fork to this whitelist. You can see your build run in the Code Pipeline console after logging into the Synapse-Dev AWS account. You can further customize the build by setting repository variables/secrets as described here.
Deleting CloudFormation Stacks
- Verify the name the CloudFormation stack you wish to delete at https://console.aws.amazon.com/cloudformation under the "Stack Name" column
- Go to http://build-system-synapse.sagebase.org:8081/job/Delete%20CloudFormation%20Stack/build?delay=0sec
- Enter the "Stack Name" you wish to delete as the parameter of the build and click the "Build" button
