Macintosh Bootstrap Tips
Xcode Installation
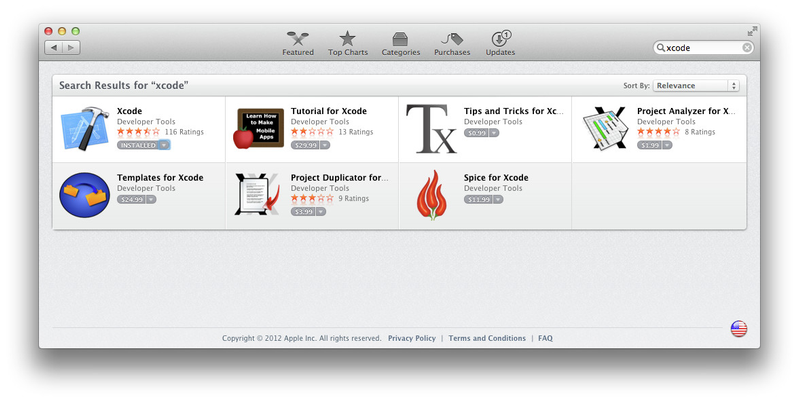
By default, OSx lacks many of the developer tools that are present on most *nix systems. Apple distributes these tools as part of the "Xcode" package, which is available on the App Store:
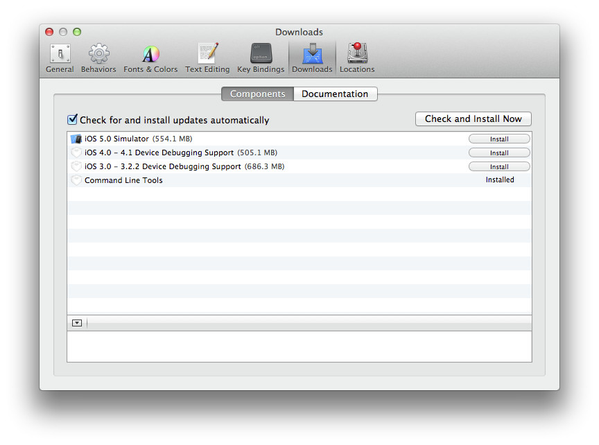
After installing Xcode, you will need to install the command line tools:
1) open Xcode
2) select Xcode -> Preferences
3) Click on the "Install" button next to "Command LIne Tools"
Homebrew Package Manager
OSx is based on BSD UNIX and as a result has many unix utilities and developer tools. Unfortunately Apple has included many non-standard and out of date versions of these unix utilities that can create problems when building and installing open-source software. Several package managers have emerged for OSx that simplify the installation and management of open source utilities and software that can be used to "fix-up" OSx to be more "unix-like". Fink and MacPorts were popular in the past, but have been losing popularity recently in favor of Homebrew.
Installing Homebrew
Homebrew installation is simple and full instructions can be found here. In short, run the following command at the terminal:
$ ruby <(curl -fsSk https://raw.github.com/mxcl/homebrew/go)
$ brew doctor
****IMPORTANT: You must add /usr/local/bin to your PATH environment variable ahead of /usr/bin in order for the Homebrew version of utilities to be found.****
Add the following to your ~/.bash_profile:
PATH=/usr/local/bin:$PATH
Installing Homebrew "formulas"
OSx + Xcode comes with Python and Subversion, but not MySQL, (the correct version of) Maven, git or R. These can be installed easily with homebrew:
$ brew install maven gfortran mysql git
Note: Mountain Lion users will need to install the latest version of XQuartz, available here.
Some R packages containing C code are incompatible with clang, which homebrew uses by default. Build R using llvm to get around this issue
$ brew install R --use-llvm
Post-installation configuration: MySQL
1) Configure MySQL to run as your user:
$ unset TMPDIR
$ mysql_install_db --verbose --user=`whoami` --basedir="$(brew --prefix mysql)" --datadir=/usr/local/var/mysql --tmpdir=/tmp
2) Make the MySQL installation secure:
$ mysql.server start
$ mysql_secure_installation
$ mysql.server stop
3) Optional: Configure MySQL to run at startup:
$ mkdir -p ~/Library/LaunchAgents
$ cp /usr/local/Cellar/mysql/5.5.25a/homebrew.mxcl.mysql.plist ~/Library/LaunchAgents/
$ launchctl load -w ~/Library/LaunchAgents/homebrew.mxcl.mysql.plist
Post-Installation configuration: Maven
1) Display Maven installation info:
$ mvn --version
Apache Maven 3.0.4 (r1232337; 2012-01-17 00:44:56-0800)
Maven home: /usr/local/Cellar/maven/3.0.4/libexec
Java version: 1.6.0_33, vendor: Apple Inc.
Java home: /System/Library/Java/JavaVirtualMachines/1.6.0.jdk/Contents/Home
Default locale: en_US, platform encoding: MacRoman
OS name: "mac os x", version: "10.8", arch: "x86_64", family: "mac"
2) Add the following to your ~/.bash_profile, filling in the values for JAVA_HOME and M2_HOME from step 1) :
export JAVA_HOME=/System/Library/Java/JavaVirtualMachines/1.6.0.jdk/Contents/Home
export M2_HOME=/usr/local/Cellar/maven/3.0.4/libexec
export M2=$M2_HOME/bin
export MAVEN_OPTS="-Xms256m -Xmx512m"
Eclipse on Mac
I used "Eclipse IDE for Java EE Developers", 64 bit version
Do install mvn-2-eclipse, from Eclipse.
You may be prompted to install open.collab.net
MySQL Workbench
Download MySQL Workbench from here
In MySQL Workbench, select New Server Instance, and follow the wizard.
let server name default to mysqld@localhost
In MySQL Workbench "Manage Security"
Add Account
Login Name: dev<your-id>
Password: <standard>
Be specific when specifying the host and schema: Don't use the '%' wildcard but use host=localhost and schema=dev<your-id>
When creating Connection for dev<your-id>, use 'localhost' not 127.0.0.1
To view Unix system from Mac
Open Finder
Goto: Go> Connect to Server
Server address: smb://sagefiles/work
click 'connect'
Connect as: "Registered User"
Name: <your hutch user name>
Password: <your hutch password>
Select the "Remember this password…" checkbox.
Click "Connect"
Miscellaneous Tips
1) To work at the shell level, use the Terminal app with a bash shell.
2) If you edit a *.sh file with TextEdit, you won't be able to run it until you run
xattr -d com.apple.quarantine <filename>
3) To see files starting with "." in the Finder:
In Terminal type:
defaults write com.apple.finder AppleShowAllFiles TRUE
killall Finder
Now select Option + right-click (i.e. 2 finger click) on Finder, then select Relaunch from pop-up menu
You will now see files starting with "." in Finder (!)
Install Oracle JDK 7
The package lib-javadoc, which is used to compile the REST API docs, introduces a dependency to Oracle's JDK 7. The most recent Mac OS X made the Oracle JDK 7 installer fail. I have
to do the following to work around the issue:
1) Assume you have installed the latest Oracle JDK 7.
2) Edit .bash_profile or .profile in your home directory. In the file, fix the JAVA_HOME and PATH variables like such,
export JAVA_HOME='/Library/Java/JavaVirtualMachines/jdk1.7.0_25.jdk/Contents/Home'
export PATH=/Library/Java/JavaVirtualMachines/jdk1.7.0_25.jdk/Contents/Home/bin:$PATH

