| Section | ||||||||||||||||||||||
|---|---|---|---|---|---|---|---|---|---|---|---|---|---|---|---|---|---|---|---|---|---|---|
|
...
Fork the Sage-Bionetworks Synapse-Repository-Services repository into your own GitHub account: https://help.github.com/articles/fork-a-repo
Make sure you do not have any spaces in the path of your development directory, the parent directory for PLFM and SWC. For example: C:\cygwin64\home\Njand\Sage Bionetworks\Synapse-Repository-Services needs to become: C:\cygwin64\home\Njand\SageBionetworks\Synapse-Repository-Services
Check out everything
Code Block git clone https://github.com/[YOUR GITHUB NAME]/Synapse-Repository-Services.git
Setup the Sage Bionetwork Synapse-Repository-Services repository to be the "upstream" remote for your clone
Code Block language bash # change into local clone directory cd Synapse-Repository-Services # set Sage-Bionetwork's Synapse-Repository-Services as remote called "upstream" git remote add upstream https://github.com/Sage-Bionetworks/Synapse-Repository-Services
Download your forked repo's develop branch, then pull in changes from the central Sage-Bionetwork's Synapse-Repository-Services develop branch
Code Block language bash # bring origin's develop branch down locally git checkout -b develop remotes/origin/develop # fetch and merge changes from the Sage-Bionetworks repo into your local clone git fetch upstream git merge upstream/develop
Note: this is NOT how you should update your local repo in your regular workflow. For that see the Git Workflow page.
- Stack Name
- Your stack name will be
dev - Your stack instance will be whatever you like, we recommend your unix username
- Your stack name will be
- Setup MySQL
- Mac user should Launching MySQL with Docker to start an instance through docker compose.
- Start a command-line mysql session with "sudo mysql"
Create a MySQL user with your named
dev[YourUsername]with a password ofplatform.Code Block create user 'dev[YourUsername]'@'%' identified BY 'platform'; grant all on *.* to 'dev[YourUsername]'@'%' with grant option;
Create a MySQL schema named
dev[YourUsername]and grant permissions to your user.Code Block create database `dev[YourUsername]`; # This might not be needed anymore grant all on `dev[YourUsername]`.* to 'dev[YourUsername]'@'%';
Create a schema for the tables feature named
dev[YourUsername]tablesCode Block create database `dev[YourUsername]tables`; # This might not be needed anymore grant all on `dev[YourUsername]tables`.* to 'dev[YourUsername]'@'%';
This allows legacy MySQL stored functions to work. It may not be necessary in the future if all MySQL functions are updated to MySQL 8 standards.
Code Block set global log_bin_trust_function_creators=1;
Note: Use set PERSIST in order to keep the configuration parameter between MySQL restarts (e.g. if the MySQL service is not setup to start automatically). Alternatively, use the Options Files to set this checkbox (under the Logging tab, under Binlog Options).
This allows queries with ORDER BY/GROUP BY clauses where the SELECT list does not match the ORDER BY/GROUP BY clause.
Code Block language sql SET GLOBAL sql_mode=(SELECT REPLACE(@@sql_mode,'ONLY_FULL_GROUP_BY',''));
- Setup AWS Resources
The build expects certain AWS resources to be instantiated. Use a Jenkins stack builder job to automatically instantiate the build for you. Note that you will need a IAM account before the build can provision resources on AWS. To create an IAM account, fork and edit this template. (See /wiki/spaces/IT/pages/392658945).
If you wish to delete any of the resources you created see the "141813264" section.- Log in to https://build-system-synapse.dev.sagebase.org and create a new job (click New Item in dashboard).
You will need to be on the VPN to access the Jenkins Server, directions to set up VPN can be found here, as well as an account on the Jenkins server (contact IT). - name the project
stackbuilder-dev-[YourUsername]and copy settings fromstackbuilder-repo-develop-build. Then click OK
- Click on the "Build" tab and modify the line
" -Dorg.sagebionetworks.instance=YourUsername"\
Then click Save.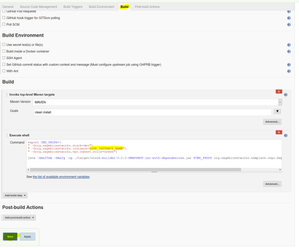
Note:This may be represented as a String Parameter: " -Dorg.sagebionetworks.instance=${INSTANCE}"\, in that case, change the value of theINSTANCEparameter to YourUsername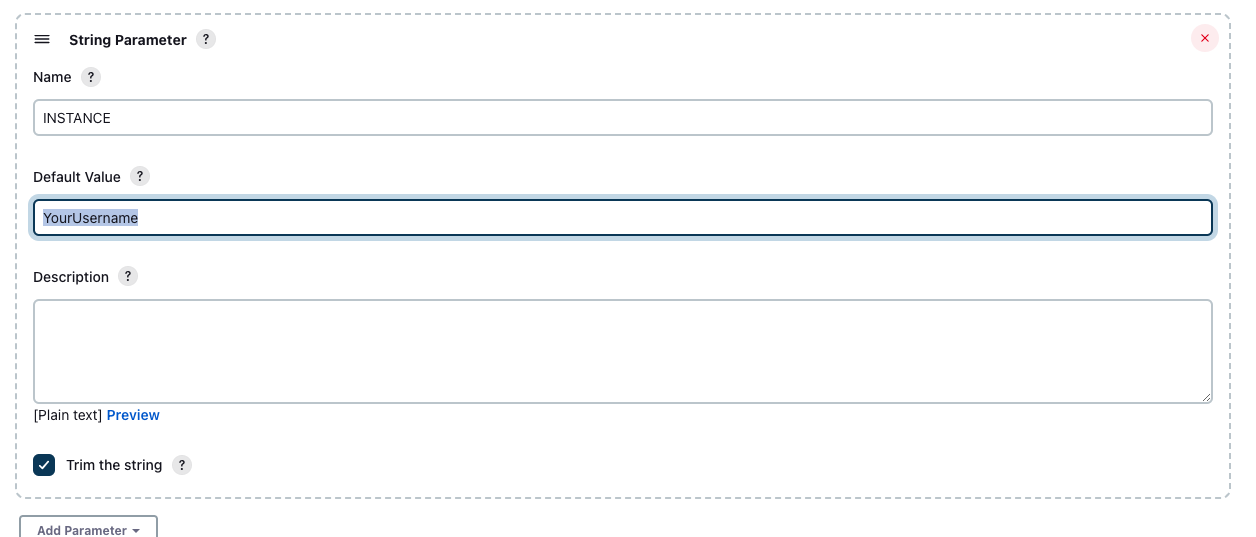
- On the next page, click "Build with Parameters" in the left navigation then "Build". Proceed to the next steps while waiting for this build to complete.
- Log in to https://build-system-synapse.dev.sagebase.org and create a new job (click New Item in dashboard).
- Create your maven settings file ~
/.m2/settings.xml- The settings file tells maven where to find your property file and what encryption key should be used to decrypt passwords.
Use this
settings.xmlas your template
Code Block language xml title settings.xml <settings xmlns="http://maven.apache.org/SETTINGS/1.0.0" xmlns:xsi="http://www.w3.org/2001/XMLSchema-instance" xsi:schemaLocation="http://maven.apache.org/SETTINGS/1.0.0 http://maven.apache.org/xsd/settings-1.0.0.xsd"> <localRepository/> <interactiveMode/> <usePluginRegistry/> <offline/> <pluginGroups/> <servers/> <mirrors/> <proxies/> <profiles> <profile> <id>dev-environment</id> <activation> <activeByDefault>true</activeByDefault> </activation> <properties> <org.sagebionetworks.stackEncryptionKey>20c832f5c262b9d228c721c190567ae0</org.sagebionetworks.stackEncryptionKey> <org.sagebionetworks.developer>YourUsername</org.sagebionetworks.developer> <org.sagebionetworks.stack.instance>YourUsername</org.sagebionetworks.stack.instance> <org.sagebionetworks.stack.iam.id>yourAwsDevIamId</org.sagebionetworks.stack.iam.id> <org.sagebionetworks.stack.iam.key>yourAwsDevIamKey</org.sagebionetworks.stack.iam.key> <org.sagebionetworks.google.cloud.enabled>true</org.sagebionetworks.google.cloud.enabled> <!-- If using not using Google Cloud, set the above setting to false. The following org.sagebionetworks.google.cloud.* settings may be omitted --> <org.sagebionetworks.google.cloud.client.id>googleCloudDevAccountId</org.sagebionetworks.google.cloud.client.id> <org.sagebionetworks.google.cloud.client.email>googleCloudDevAccountEmail</org.sagebionetworks.google.cloud.client.email> <org.sagebionetworks.google.cloud.key>googleCloudDevAccountPrivateKey</org.sagebionetworks.google.cloud.key> <org.sagebionetworks.google.cloud.key.id>googleCloudDevAccountPrivateKeyId</org.sagebionetworks.google.cloud.key.id> <org.sagebionetworks.stack>dev</org.sagebionetworks.stack> </properties> </profile> </profiles> <activeProfiles/> </settings>- Everywhere you see "YourUsername", change it to your stack instance name (i.e. the username you used to set up MySQL and the AWS shared-resources)
- Get AWS IAM ID and Key from http://aws.amazon.com/iam/ (see whoever manages those accounts) and get admin privileges for AWS IAM
- Click on "My security credentials"
- On the AWS IAM credentials tab and under "Access keys for CLI, SDK, & API access", click on "Create access key"
- The ID will look something like AKIAIOSFODNN7EXAMPLE, and the Key will look something like wJalrXUtnFEMI/K7MDENG/bPxRfiCYEXAMPLEKEY
- If using Google Cloud (recommended if you are working on file upload features), get the Google Cloud developer credentials from the shared LastPass entry titled 'synapse-google-storage-dev-key'. Paste the corresponding fields in the attached JSON file into the org.sagebionetworks.google.cloud elements. Note the private key should be given on one line, with new lines separated with '\n' and NOT '\\n'.
- If you don't need to use Google Cloud features, then set
org.sagebionetworks.google.cloud.enabledto be false. The other Google Cloud parameters can be omitted.
- If you don't need to use Google Cloud features, then set
Once your settings file is setup, you can Build everything via
`mvn`which will run all the tests and then install any resulting jars and wars in your local maven repository.Code Block cd Synapse-Repository-Services mvn install
- Note that you might get an error that says
Illegal access: this web application instance has been stopped already.This is normal. Scroll up to see whether the build succeeded or failed. (You may have to scroll through several pages of this error.) - If tests fail, then you should run
mvn clean installafter debugging your failed build. - Many tests assume you have a clean database. Before running tests, be sure to drop all tables in your database. Synapse will automatically recreate them as part of the tests.
- When you pull updates from upstream, be sure to run
mvn clean install -DskipTestsfrom the root project, which will rebuild everything. If necessary, runmvn testfrom the root to ensure all tests pass. - Tests can also fail because sometimes IntelliJ does not configure itself appropriately, if this case, please following these steps.
- Go to the Synapse-Repository-Services repository and execute ls -a to find '.idea' folder, which is the configuration folder of IntelliJ IDEA.
- Execute 'rm -r .idea' to delete configuration folder and re-configure IntelliJ IDEA (please follow 'Configuring IntelliJ IDEA' section again)
- Either terminal in IntelliJ IDEA or own terminal, execute 'mvn clean install -Dmaven.test.skip=true' to make sure all files are configured correctly. (skipTests are deprecated in Maven Surefire Plugin Version 3.0.0-M3)
If the integration tests fail, try restarting the computer. This resets the open connections that may have become saturated while building/testing.
- Note that you might get an error that says
- Take a look at the javadocs, they are in
target/apidocs/index.htmlandtarget/testapidocs/index.htmlfor each package
...
| Code Block |
|---|
export user=p<user>
export org_sagebionetworks_stack_iam_id=
export org_sagebionetworks_stack_iam_key=
export org_sagebionetworks_stackEncryptionKey=
export rds_password=platform
export github_token=<token-created-from-github>

/var/lib/jenkins/workspace/${JOB_NAME}/jenkins_build.sh
|
NOTE: You will need to be a member of the Sage GitHub Organization (https://github.com/orgs/Sage-Bionetworks/teams/synapse-developers) in order to for your token to work. Reach out to IT if you are not yet a member.