On This page
On Related Pages
Developer AWS Accounts
See instructions for General Sage AWS accounts.
Use your individual AWS account under the Sage consolidated bill for AWS experiments. The rule of thumb is that if you cannot shut off what ever you are running while you are on vacation, it belongs in the Production AWS Account.
Production AWS Account
Use your IAM Account for:
- S3
- EC2
- Elastic MapReduce (command line access only right now)
- You will need to log into the AWS console with you IAM login and password: https://325565585839.signin.aws.amazon.com/console/ec2
Use the platform@sagebase.org Account for:
- Elastic Beanstalk
- console usage of Elastic MapReduce
- You will need to log into the AWS console with the platform@sagebase.org username and password: https://console.aws.amazon.com/
Credentials, passwords, ssh keys
You can find them on our shared servers. When storing passwords locally on your laptop (which already has an encrypted drive, yay!) you might also consider using Password Safe.
/work/platform>hostname
sodo
/work/platform>find PasswordsAndCredentials -type f
PasswordsAndCredentials/PlatformIAMCreds/brian.holt_creds.txt
PasswordsAndCredentials/PlatformIAMCreds/bruce.hoff_creds.txt
PasswordsAndCredentials/PlatformIAMCreds/david.burdick_creds.txt
PasswordsAndCredentials/PlatformIAMCreds/john.hill_creds.txt
PasswordsAndCredentials/PlatformIAMCreds/mike.kellen_creds.txt
PasswordsAndCredentials/PlatformIAMCreds/nicole.deflaux_creds.txt
PasswordsAndCredentials/PlatformIAMCreds/repository.service_creds.txt
PasswordsAndCredentials/PlatformIAMCreds/test_creds.txt
PasswordsAndCredentials/PlatformIAMCreds/integration.test@sagebase.org_creds.txt
PasswordsAndCredentials/SshCertificates/self-signed-crowd-tomcat.cer
PasswordsAndCredentials/PlatformAWSCredentials/cert-ACQDRLBJ7TXKIZ6KQNONJWH57GDPA2X4.pem
PasswordsAndCredentials/PlatformAWSCredentials/i-361d9b59.RDPCertificate
PasswordsAndCredentials/PlatformAWSCredentials/i-361d9b59.windowsPassword
PasswordsAndCredentials/PlatformAWSCredentials/i-361d9b59.windowsPassword~
PasswordsAndCredentials/PlatformAWSCredentials/pk-ACQDRLBJ7TXKIZ6KQNONJWH57GDPA2X4.pem
PasswordsAndCredentials/PlatformAWSCredentials/platformIAMCLI_CredentialFile.txt
PasswordsAndCredentials/passwords.txt
PasswordsAndCredentials/SshKeys/mysql-ssl-ca-cert.pem
PasswordsAndCredentials/SshKeys/PlatformKeyPairEast.pem
PasswordsAndCredentials/SshKeys/PlatformKeyPair.pem
PasswordsAndCredentials/SshKeys/tranSMARTDemo.pem
PasswordsAndCredentials/AtlassianAccountAWSCredentials/cert-MEF3B5GUK5T4LRUSBQ423ZYMXXRPRBJU.pem
PasswordsAndCredentials/AtlassianAccountAWSCredentials/elasticbamboo.pk
PasswordsAndCredentials/AtlassianAccountAWSCredentials/pk-MEF3B5GUK5T4LRUSBQ423ZYMXXRPRBJU.pem
First time accessing the console
Create a password for yourself using the IAM tools. You can install the IAM tools on your machine http://docs.amazonwebservices.com/IAM/latest/GettingStartedGuide/index.html?GetTools.html or use them on sodo.
ssh you@sodo
cd /work/platform
bash
source bin/setupIamClient.sh
iam-useraddloginprofile -u YourFirstname.YourLastname -p aDecentPassword
Miscellaneous How To's
How to SSH to an EC2 Host
Connecting from Linux
ssh -i PlatformKeyPairEast.pem ec2-user@<the ec2 host>
For screen shots see EC2 docs
Connecting from Windows using Putty
For screen shots see EC2 docs
Window's users can also connect using PuTTY or WinSCP, however you will to first create a PuTTY private key file using puttygen.exe
Here is how to create the private key file:
- Run the 'puttygen.exe' tool
- Select the 'load' button from the UI.
- From the file dialog select your the KeyPair file (i.e. PlatformKeyPairEast.pem)
- A popup dialog should tell you the key file was imported sucessfully and to save it using "Save private Key"
- Select 'Save Private Key' and give it a name such as PlatformKeyPairEast.ppk to create the PuTTY private key file.
Once you have a PuTTY private key file you can use it to connect to your host using PuTTY or WinSCP.
To connect with WinSCP:
- Set the host name, and keep the default port (22). Note: Make sure port 22 is open on the box you are connecting to.
- Set the user name to ec2-user
- Select the '...' button under 'Private Key File' and select the .ppk file you created above.
- Select 'Login'
Figure out if AWS is broken
AWS occasionally has issues. To figure out whether the problem you are currently experiencing is their fault or not:
- Check the AWS status console to see if they are reporting any problems http://status.aws.amazon.com/
- Check the most recent messages on the forums https://forums.aws.amazon.com/index.jsp Problems often get reported there first.
- If you still do not find evidence that the problem is AWS's fault, search the forums for your particular issue. Its likely that someone else has run into the same exact problem in the past.
- Still no luck? Ask your coworkers and/or post a question to the forums.
How to save money on the AWS bill
If you use EBS-backed AMIs you can "stop" (not "terminate") your instance when you are not using it. Your root partition and other EBS volumes stick around and you are only charged for EBS usage while the instance is "stopped". When you need to use it again you "start" the instance and then re-start your applications.
You can also start with a less expensive instance type easily upgrade to a larger size in this same manner. One thing to note is that you cannot switch between 32bit to 64bit OS - choose well for your initial choice.
S3 How To's
Run a Report to Know Who has Accessed What When
Use Elastic MapReduce to run a script on all our logs in the bucket logs.sagebase.org. There are some scripts in bucket emr.sagebase.org/scripts that will do the trick. If you want to change what they do, feel free to make new scripts.
Here is what a configured job looks like:

And here is some sample output from the job. Note that:
- All Sage employees will have their sagebase.org username as their IAM username
- Platform users register with an email address and we will use that email address as their IAM username.
- User
d9df08ac799f2859d42a588b415111314cf66d0ffd072195f33b921db966b440is the platform@sagebase.org user (also known as Brian Holt :-). In general, you should only see activity from that user when we are using BucketExplorer to manage our files in S3.arn:aws:iam::325565585839:user/nicole.deflaux [18/Feb/2011:19:32:44 +0000] REST.GET.OBJECT human_liver_cohort/readme.txt arn:aws:iam::325565585839:user/nicole.deflaux [18/Feb/2011:19:32:56 +0000] REST.GET.OBJECT human_liver_cohort/readme.txt arn:aws:iam::325565585839:user/nicole.deflaux [18/Feb/2011:19:32:58 +0000] REST.GET.OBJECT human_liver_cohort/readme.txt arn:aws:iam::325565585839:user/nicole.deflaux [18/Feb/2011:17:47:45 +0000] REST.GET.LOCATION - arn:aws:iam::325565585839:user/nicole.deflaux [18/Feb/2011:23:42:17 +0000] REST.GET.LOGGING_STATUS - arn:aws:iam::325565585839:user/nicole.deflaux [18/Feb/2011:23:42:19 +0000] REST.HEAD.OBJECT human_liver_cohort.tar.gz arn:aws:iam::325565585839:user/nicole.deflaux [18/Feb/2011:19:32:40 +0000] REST.GET.BUCKET - arn:aws:iam::325565585839:user/nicole.deflaux [18/Feb/2011:17:47:46 +0000] REST.GET.BUCKET - arn:aws:iam::325565585839:user/nicole.deflaux [17/Feb/2011:01:48:42 +0000] REST.GET.BUCKET - arn:aws:iam::325565585839:user/nicole.deflaux [17/Feb/2011:01:48:42 +0000] REST.GET.LOCATION - arn:aws:iam::325565585839:user/nicole.deflaux [17/Feb/2011:01:48:51 +0000] REST.HEAD.OBJECT mouse_model_of_sexually_dimorphic_atherosclerotic_traits.tar.gz arn:aws:iam::325565585839:user/nicole.deflaux [17/Feb/2011:01:48:51 +0000] REST.GET.ACL mouse_model_of_sexually_dimorphic_atherosclerotic_traits.tar.gz arn:aws:iam::325565585839:user/nicole.deflaux [18/Feb/2011:23:42:17 +0000] REST.GET.ACL - arn:aws:iam::325565585839:user/nicole.deflaux [18/Feb/2011:23:42:19 +0000] REST.GET.ACL human_liver_cohort.tar.gz arn:aws:iam::325565585839:user/nicole.deflaux [18/Feb/2011:23:42:57 +0000] REST.HEAD.OBJECT mouse_model_of_sexually_dimorphic_atherosclerotic_traits.tar.gz arn:aws:iam::325565585839:user/nicole.deflaux [18/Feb/2011:23:42:17 +0000] REST.GET.NOTIFICATION - arn:aws:iam::325565585839:user/nicole.deflaux [18/Feb/2011:23:42:57 +0000] REST.GET.ACL mouse_model_of_sexually_dimorphic_atherosclerotic_traits.tar.gz arn:aws:iam::325565585839:user/test [17/Feb/2011:01:55:44 +0000] REST.GET.OBJECT mouse_model_of_sexually_dimorphic_atherosclerotic_traits.tar.gz arn:aws:iam::325565585839:user/test [16/Feb/2011:23:13:42 +0000] REST.GET.OBJECT human_liver_cohort/readme.txt arn:aws:iam::325565585839:user/test [16/Feb/2011:23:22:02 +0000] REST.GET.OBJECT human_liver_cohort/expression/expression.txt d9df08ac799f2859d42a588b415111314cf66d0ffd072195f33b921db966b440 [16/Feb/2011:23:06:17 +0000] REST.HEAD.OBJECT human_liver_cohort/readme.txt d9df08ac799f2859d42a588b415111314cf66d0ffd072195f33b921db966b440 [16/Feb/2011:22:28:38 +0000] REST.GET.ACL - d9df08ac799f2859d42a588b415111314cf66d0ffd072195f33b921db966b440 [16/Feb/2011:22:39:57 +0000] REST.GET.LOCATION - d9df08ac799f2859d42a588b415111314cf66d0ffd072195f33b921db966b440 [16/Feb/2011:22:40:09 +0000] REST.COPY.OBJECT bxh_apoe/causality_result/causality_result_adipose_male.txt d9df08ac799f2859d42a588b415111314cf66d0ffd072195f33b921db966b440 [16/Feb/2011:22:40:16 +0000] REST.HEAD.OBJECT bxh_apoe/causality_result/causality_result_adipose_male.txt . . . Downloads per file: bxh_apoe/networks/BxH-ApoE_Brain_Male_batch_3_14_coexp-network.txt 2 bxh_apoe/networks/muscle_male-nodes.txt 2 bxh_apoe/networks/BxH-ApoE_Liver_Male_batch_3_4_coexp-log.txt 2 bxh_apoe/networks/SCN10_BxH-ApoE_Adipose_Male_batch_3_10_coexp.sif 2 bxh_apoe/networks/SCN19_muscle_female_bayesian.sif 2 human_liver_cohort/networks/deLiver_liver_all_adjusted_DE-Octave8_coexp-nodes.txt 2 bxh_apoe/networks/BxH-ApoE_Liver_Male_batch_3_4_coexp-annotation.txt 2 bxh_apoe/networks/BxH-ApoE_Brain_Male_batch_3_14_coexp-nodes.txt 2 bxh_apoe/networks/muscle_female-nodes.txt 2 human_liver_cohort/networks/QuickChip_female_bayesian-annotation.txt 2 . . . bxh_apoe/networks/liver_female_coexp-annotation.txt 2 bxh_apoe/networks/SCN15_BxH-ApoE_Muscle_Female_batch_1_11_coexp.sif 2 bxh_apoe/networks/SCN7_brain_female_bayesian.sif 2 human_liver_cohort/sage_bionetworks_user_agreement.pdf 5 bxh_apoe/phenotype/ 1 bxh_apoe/networks/SCN14_BxH-ApoE_Liver_Male_batch_3_4_coexp.sif 2 Downloads per user: arn:aws:iam::325565585839:user/nicole.deflaux 17 arn:aws:iam::325565585839:user/test 3 d9df08ac799f2859d42a588b415111314cf66d0ffd072195f33b921db966b440 931
Upload a dataset to S3
UPDATE: We no longer use bucket explorer to upload datasets. Instead we now use datasetCsvLoader.py. Run it with --help to see its options. You can still use bucket explorer to browse datasets.
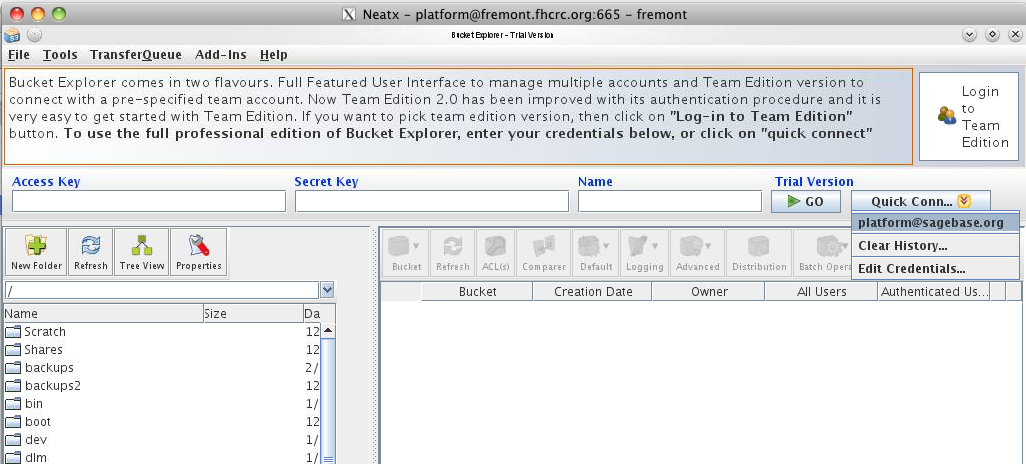
For the initial upload, a GUI tool called BucketExplorer (http://www.bucketexplorer.com/) is used. Uploads are done from the internal host sodo.fhcrc.org using the local access account 'platform', with the same password as the platform@sagebase.org account. The most efficient way to connect is to use an NX protocol client (http://www.nomachine.com/download.php) to get a virtual desktop as the user platform. Once connected the preconfigured BucketExplorer can be found in the application menu in the lower left corner of the screen.
Mac OSX Users I installed "NX Client for Mac OSX" but it complained that I was missing bin/nxssh and bin/nxservice. That stuff was not installed under Applications but instead under /Users/deflaux/usr/NX/
The initial datasets are stored in /work/platform/source/. This entire collection is mirrored exactly and can transfered by dragging and dropping into the data01.sagebase.org s3 bucket. This operation should be done as user platform, as all files should be readable by said user to facilitate the transfer. When adding a new dataset to /work/platform/source/, the script /work/platform/breakout_layers should be run as the platform user in order to breakout the layers into separate files. The script requires two arguments, one being the name of the dataset and two being the directory name in the source file that contains the dataset.
BucketExplorer is very efficient, and will do hash comparisons and only transfer what files have changed. One can also get a visual comparison of what files have changed using the 'Comparer' button. During the transfer, the program will parallelize the transfer into 20 streams for very efficient use of outgoing bandwidth to the cloud.
How to give someone else full access to your S3 Bucket
The policy below gives someone full access (list, read, write, delete) to your bucket.
{
  "Id": "Policy1305325502034",
  "Statement": [
    {
      "Sid": "Stmt1305324625148",
      "Action": "s3:*",
      "Effect": "Allow",
      "Resource": "arn:aws:s3:::THE_BUCKET/*",
      "Principal": {
        "AWS": [
          "THE_PERSONS_AWS_ACCOUNT_NUMBER"
        ]
      }
    },
    {
      "Sid": "Stmt1305325498087",
      "Action": "s3:*",
      "Effect": "Allow",
      "Resource": "arn:aws:s3:::THE_BUCKET",
      "Principal": {
        "AWS": [
          "THE_PERSONS_AWS_ACCOUNT_NUMBER"
        ]
      }
    }
  ]
}
IAM How To's
Create a new IAM group
You can install the IAM tools on your machine http://docs.amazonwebservices.com/IAM/latest/GettingStartedGuide/index.html?GetTools.html or use them on sodo.
We are storing our access policies in SVN: http://sagebionetworks.jira.com/source/browse/PLFM/trunk/configuration/awsIamPolicies
See the IAM documentation for more details about how to do this but here is an example of how one of our existing groups was created:
ssh you@sodo
cd /work/platform
bash
source bin/setupIamClient.sh
iam-groupcreate -g ReadOnlyUnrestrictedDataUsers
iam-groupuploadpolicy -g ReadOnlyUnrestrictedDataUsers -p ReadOnlyUnrestrictedDataPolicy -f /work/platform/awsIamPolicies/ReadOnlyUnrestrictedDataPolicy.txt
iam-groupadduser -u test -g ReadOnlyUnrestrictedDataUsers
iam-grouplistusers -g ReadOnlyUnrestrictedDataUsers
Create a new user and add them to IAM groups
You can install the IAM tools on your machine http://docs.amazonwebservices.com/IAM/latest/GettingStartedGuide/index.html?GetTools.html or use them on sodo.
Note that this is for adding Sage employees to groups by hand. The repository service will take care of adding Web Client and R Client users to the right IAM group(s) after they sign a EULA for a dataset.
See the IAM documentation for more details about how to do this but here is an example of how Bruce's IAM user was created:
ssh you@sodo
cd /work/platform
bash
source bin/setupIamClient.sh
iam-usercreate -u bruce.hoff -g Admins -k -v > PasswordsAndCredentials/PlatformIAMCreds/bruce.hoff_creds.txt
Then give the user their credentials file.
RDS and MySQL How To's
How to connect to RDS
Use the MySQL client. You can install it locally on your machine (do this by installing a local MySQL database too.) Or you can use it on sodo.
The firewall currently only allows you to connect from a server inside the Fred Hutch network. If you are working from home, ssh to sodo and then do this. You can find the database password in sodo:/work/platform/PasswordsAndCredentials/passwords.txt
The produser account has full access to all databases, so be careful! The platform user is superuser and should only be used for creating new databases and users, and setting permissions.
~>hostname
sodo
~>/usr/bin/mysql --ssl-ca=/work/platform/PasswordsAndCredentials/SshKeys/mysql-ssl-ca-cert.pem -u produser -h repo.c5sxx7pot9i8.us-east-1.rds.amazonaws.com -p
Enter password:
Welcome to the MySQL monitor.  Commands end with ; or \g.
Your MySQL connection id is 6212
Server version: 5.5.8-log Source distribution

Copyright (c) 2000, 2010, Oracle and/or its affiliates. All rights reserved.
This software comes with ABSOLUTELY NO WARRANTY. This is free software,
and you are welcome to modify and redistribute it under the GPL v2 license

Type 'help;' or '\h' for help. Type '\c' to clear the current input statement.

mysql> show databases;
+--------------------+
| Database           |
+--------------------+
| information_schema |
| innodb             |
| performance_schema |
| repositorydb       |
+--------------------+
4 rows in set (0.07 sec)

mysql> use repositorydb;
Reading table information for completion of table and column names
You can turn off this feature to get a quicker startup with -A

showDatabase changed
mysql> show tables;
+------------------------+
| Tables_in_repositorydb |
+------------------------+
| JDOANALYSISRESULT   |
| JDOANNOTATIONS      |
| JDODATASET          |
| JDODATASETANALYSIS  |
| JDODATEANNOTATION   |
| JDODOUBLEANNOTATION |
| JDOINPUTDATALAYER   |
| JDOLAYERLOCATION    |
| JDOLAYERLOCATIONS   |
| JDOLONGANNOTATION   |
| JDOPROJECT          |
| JDORESOURCEACCESS   |
| JDOREVISION         |
| JDOSCRIPT           |
| JDOSTRINGANNOTATION |
| JDOUSER             |
| JDOUSERGROUP        |
| NUCLEUS_TABLES         |
+------------------------+
18 rows in set (0.08 sec)

mysql> desc JDODATASET;
+---------------------+--------------+------+-----+---------+----------------+
| Field               | Type         | Null | Key | Default | Extra          |
+---------------------+--------------+------+-----+---------+----------------+
| ID                  | bigint(20)   | NO   | PRI | NULL    | auto_increment |
| ANNOTATIONS_ID_OID  | bigint(20)   | YES  | MUL | NULL    |                |
| CREATION_DATE       | datetime     | YES  |     | NULL    |                |
| CREATOR             | varchar(256) | YES  |     | NULL    |                |
| DESCRIPTION         | varchar(256) | YES  |     | NULL    |                |
| NAME                | varchar(256) | YES  |     | NULL    |                |
| NEXT_VERSION_ID_OID | bigint(20)   | YES  | MUL | NULL    |                |
| RELEASE_DATE        | datetime     | YES  |     | NULL    |                |
| REVISION_ID_OID     | bigint(20)   | YES  | MUL | NULL    |                |
| STATUS              | varchar(256) | YES  |     | NULL    |                |
+---------------------+--------------+------+-----+---------+----------------+
10 rows in set (0.07 sec)

mysql> select count(*) from JDODATASET ;
+----------+
| count(*) |
+----------+
|      114 |
+----------+
1 row in set (0.08 sec)

mysql> quit
How do I bootstrap a local MySQL database?
- Setup MySQL
- Create your empty database
~/>/usr/local/mysql/bin/mysql -u root
Welcome to the MySQL monitor.  Commands end with ; or \g.
Your MySQL connection id is 1910
Server version: 5.5.9 MySQL Community Server (GPL)

Copyright (c) 2000, 2010, Oracle and/or its affiliates. All rights reserved.

Oracle is a registered trademark of Oracle Corporation and/or its
affiliates. Other names may be trademarks of their respective
owners.

Type 'help;' or '\h' for help. Type '\c' to clear the current input statement.

mysql> show databases;
+--------------------+
| Database           |
+--------------------+
| information_schema |
| mysql              |
| performance_schema |
| test               |
+--------------------+
4 rows in set (0.06 sec)

mysql> create database test2;
Query OK, 1 row affected (0.00 sec)

mysql> show databases;
+--------------------+
| Database           |
+--------------------+
| information_schema |
| mysql              |
| performance_schema |
| test               |
| test2              |
+--------------------+
5 rows in set (0.04 sec)
How to load a JDO schema into MySQL
- Use the mysql client to connect to the database host and drop/create the database as needed
- Set up the database configuration
trunk/lib/jdomodels/src/main/resources/datanucleus.propertiesis already configured for a local MySQL instance- For RDS, locally edit
trunk/lib/jdomodels/src/main/resources/datanucleus.propertiesto include the RDS host, user, and password (do not check in any production database passwords into svn)
- Run the Datanucleus schema creation tool
cd trunk/lib/jdomodels
mvn compile
mvn datanucleus:enhance
mvn datanucleus:schema-create
Download the schema as of March 23, 2011
How to get the repository service to use local MySQL instead of HDSQL
Pass a property with your jdbc connection string:
-DJDBC_CONNECTION_STRING=jdbc:mysql://localhost/test2
The default username is 'root'. If you want a different username, pass it via property -DPARAM1=myUsername
The default password is the empty string. If you want a different password, pass it via property -DPARAM2=myUsername
The relevant code is in trunk/lib/jdomodels/src/main/java/org/sagebionetworks/repo/model/jdo/PMF.java.
How to load data into an empty repository service
You can use this to load data into a repository service whether it is running on beanstalk or locally on your laptop. You can run datasetCsvLoader.py -h and datasetNuker.py -h to see more documentation. The code can be found here PLFM/users/deflaux/scripts/DatasetLoader
>ssh sodo
>cd /work/platform/DatasetMetadataLoader
/work/platform/DatasetMetadataLoader> curl http://dhcp149222.fhcrc.org:8080/repo/v1/dataset
{"results":[],"totalNumberOfResults":0,"paging":{}}
/work/platform/DatasetMetadataLoader>./datasetCsvLoader.py  -e http://dhcp149222.fhcrc.org:8080/repo/v1
lot of output here . . .
/work/platform/DatasetMetadataLoader> curl http://dhcp149222.fhcrc.org:8080/repo/v1/dataset?limit=1
{
   "results":[
      {
         "name":"Gastric Cancer ACRG",
         "annotations":"/repo/v1/dataset/0/annotations",
         "id":"0",
         "version":"0.0.1",
         "creator":"Asian Cancer Research Group, Inc., (ACRG)",
         "description":null,
         "creationDate":1299375144172,
         "status":"Future",
         "uri":"/repo/v1/dataset/0",
         "etag":"384011750",
         "releaseDate":null,
         "layer":"/repo/v1/dataset/0/layer",
         "hasExpressionData":false,
         "hasGeneticData":false,
         "hasClinicalData":false
      }
   ],
   "totalNumberOfResults":114,
   "paging":{
      "next":"/repo/v1/dataset?offset=2&limit=1"
   }
}
Beanstalk FAQ
How do I find the EC2 Instance being used to support a Beanstalk Environment?
If you look at the running EC2 instances you will see a bunch of running EC2 instances in the elastic-beanstalk security group without names. To find the name, go to the running Beanstalk environment and click on logs -> snapshot logs to get the console to tell you the name of the underlying instance name: 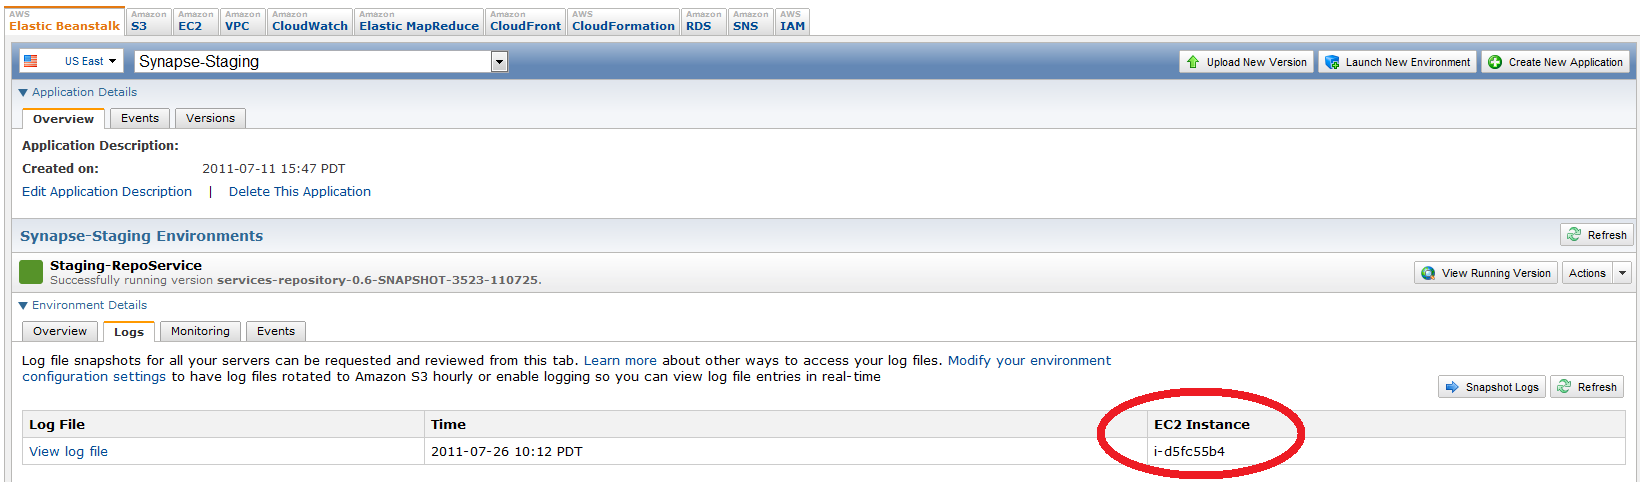
From this point, you can then go to the list of running EC2 instances and find your particular instance using the browser's find function. Note that you can rename the instances to match the beanstalk environment name, but that beanstalk recycles instances and will eventually replace your named instanced with a new one.
How do I get access to the underlying EC2 instance?
Once you have found the underlying instance, you can find the public DNS of that instance as a property of that instance. 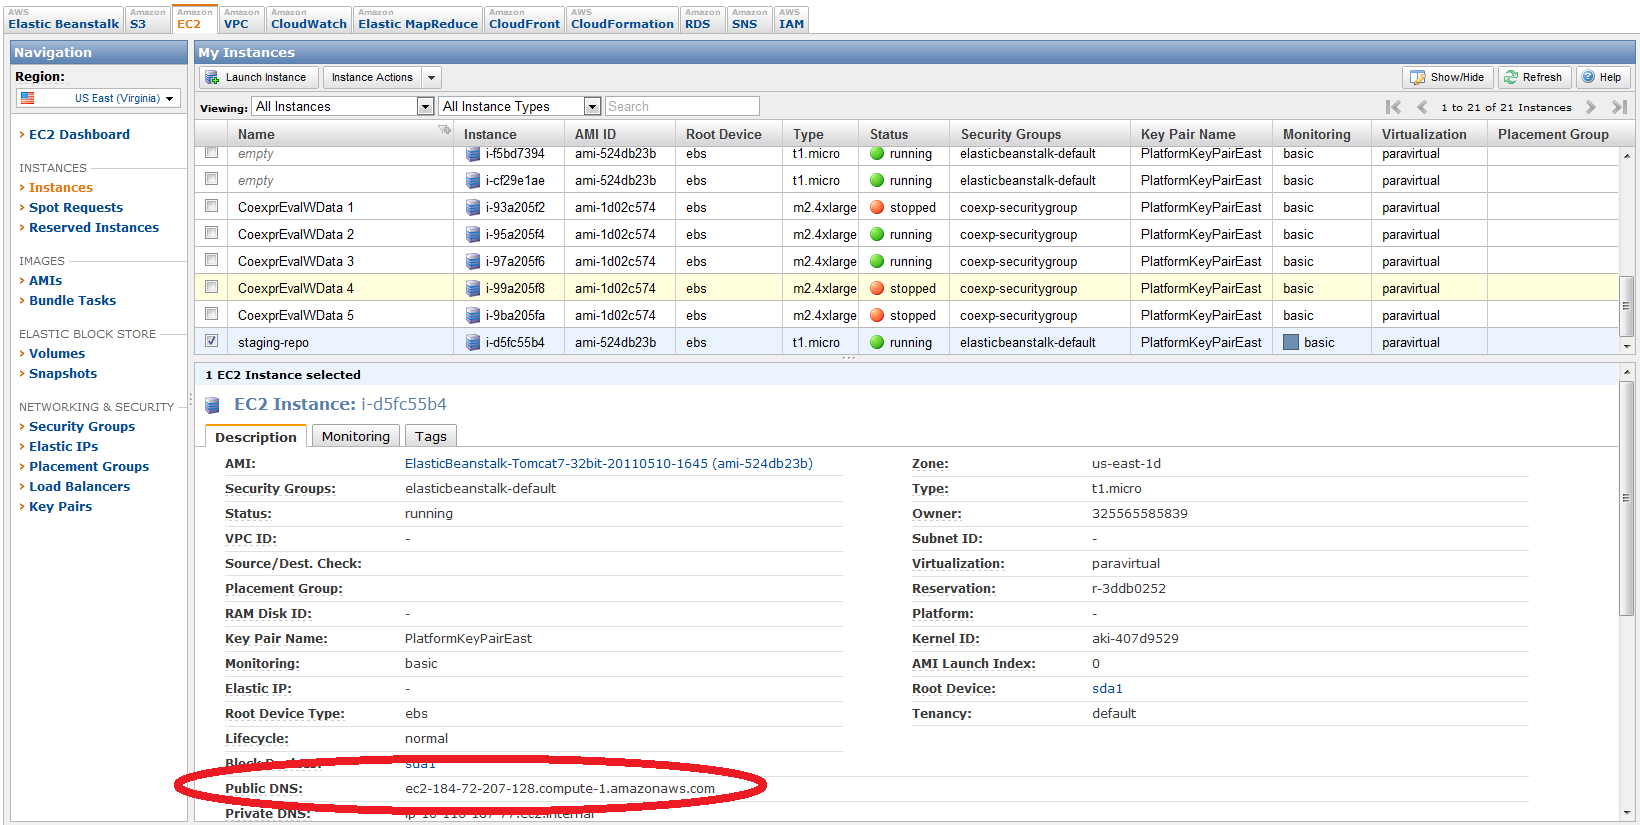
You can log on to the instance using this host name, the user "ec2-user" and a private key file generated for the private key file generated for the key pair. These are stored on sodo in /platform/work/PasswordsAndCredentials/SshKeys.
Where is the WAR file?
The servlet WAR is expanded under:
- tomcat 7
/opt/tomcat7/webapps/ROOT - tomcat 6
/var/lib/tomcat6/webapps/ROOT/
If you want to save time (and a beanstalk deployment) you can overwrite that WAR with a new WAR if you want. Don't do this on the production stack though, only test stacks!
Where are the tomcat log files?
The tomcat 7 log files are here:
ls /opt/tomcat7/logs/
localhost_access_log.2011-06-13.txt
catalina.out
juli.2011-06-13.log
monitor_catalina.log
tail_catalina.log
monitor_catalina.log.lck
tail_catalina.log.lck
The tomcat 6 log files are here:
/var/log
/var/log/tomcat6/monitor_catalina.log.lck
/var/log/tomcat6/tail_catalina.log
/var/log/tomcat6/tail_catalina.log.lck
/var/log/tomcat6/monitor_catalina.log
Where are the Apache log files?
The log files are here:
/var/log/httpd/error_log
/var/log/httpd/access_log
/var/log/httpd/elasticbeanstalk-access_log
/var/log/httpd/elasticbeanstalk-error_log
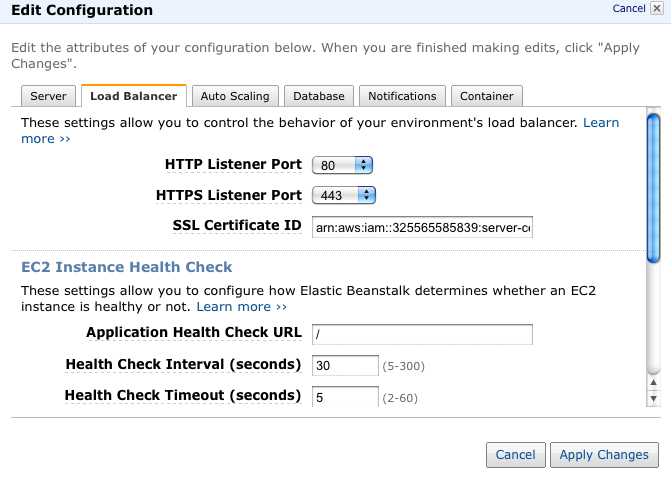
How to configure HTTPS
The ARN for the synapse.sagebase.org cert is arn:aws:iam::325565585839:server-certificate/SynapseCert
For links to more documentation and info about the ssl cert see PLFM-142
Gotchas Getting Started with Beanstalk
Here are some gotchas I ran into when using beanstalk for the first time:
- I created a key pair in US West and was confused when I couldn't get beanstalk to use that key pair.
- Beanstalk is only in US East so you have to make and use a key pair from US East
- Get the key pair PlatformKeyPairEast from sodo
- I could not ssh to my box even though I had the right key pair and the hostname.
- I needed to edit the default firewall setttings to open up port 22
- My serlvet didn't work right away and I wanted to look at stuff on disk.
- Error: java.lang.NoClassDefFoundError: javax/servlet/jsp/jstl/core/Config
- In a tomcat container, such as Elastic Beanstalk, you have to include jstl.jar manually, hence this entry.
<dependency>
	  <groupId>javax.servlet</groupId>
	  <artifactId>jstl</artifactId>
	  <version>1.2</version>
    </dependency>
- In a tomcat container, such as Elastic Beanstalk, you have to include jstl.jar manually, hence this entry.
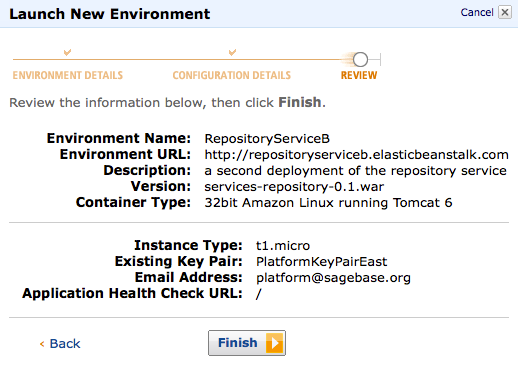
- Here's what your deployment might look like when things are working well: